| Россия |
Post-installation configuration
Startup preferences
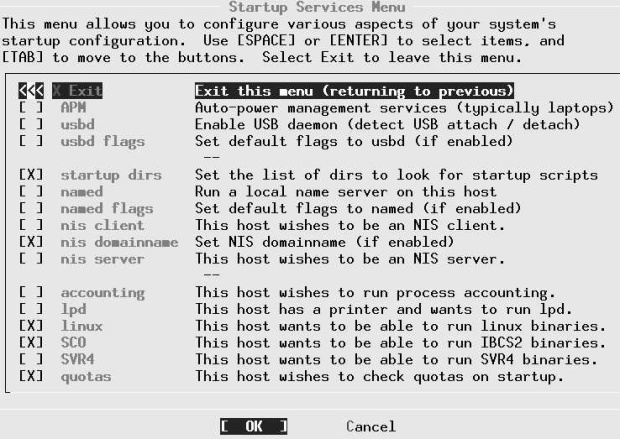
The next step of interest is the Startup submenu, which allows you to choose settings that take effect whenever you start the machine. See "Starting and stopping the system" for details of the startup files.
- Select APM if you're running a laptop. It enables you to power the system down in suspend to RAM or suspend to disk mode, preserving the currently running system, and to resume execution at a later date.
- If you have USB peripherals, select usbd to enable the usbd daemon, which recognizes when USB devices are added or removed.
- named starts a name daemon. Use this if you're connecting to the Internet at all, even if you don't have a DNS configuration: the default configuration is a caching name server, which makes name resolution faster. Just select the box; you don't need to do anything else. We'll look at named in "The Domain Name Service" .
- Select lpd, the line printer daemon, if you have a printer connected to the machine. We'll look at lpd in "Printers" .
- Select Linux if you intend to run Linux binaries. This is almost certainly the case, and by default the box is already ticked for you.
- Select SVR4 and SCO if you intend to run UNIX System V.4 (SVR4) or SCO OpenDesktop or OpenServer (SCO) binaries respectively.
Configuring the mouse
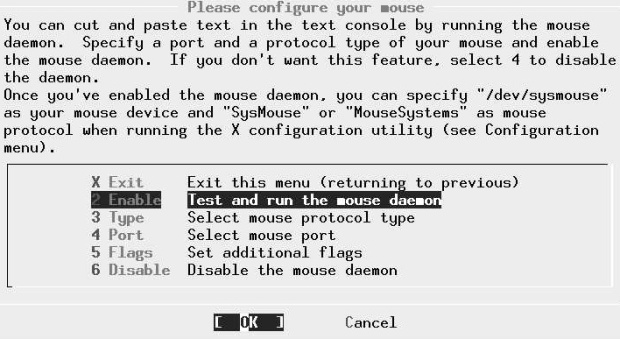
FreeBSD detects PS/2 mice at boot time only, so the mouse must be plugged in when you boot. If not, you will not be able to use it. To configure, select Mouse from the configuration menu. The menu in Figure 6-8 appears.
With a modern PS/2 mouse, you don't need to do any configuration at all. You just enable the mouse daemon or moused. Select the menu item Enable: you have the chance to move the mouse and note that the cursor follows. The keys don't work in this menu: select Yes and exit the menu. That's all you need to do.
If you're running a serial mouse, choose the item Select mouse port and set it to correspond with the port you have; if you have an unusual protocol, you may also need to set it with the Type menu. For even more exotic connections, read the man page for moused and set the appropriate parameters.
Configuring X
You should have installed X along with the rest of the system—see page 75. If you haven't, install the package x11/XFree86. In this section, we'll look at what you need to do to get X up and running.
X configuration has changed a lot in the course of time, and it's still changing. The current method of configuring X uses a program called x/86c/g, which is still under development, and it shows a few strangeness’s. Quite possibly the version you get will not behave identically with the following description. The differences should be relatively clear, however.
The configuration is stored in a file called XF86Config, thhough the directory has changed several times in the last few years. It used to be in /etc/X11/XF86Config or
/etc/XF86Config, but the current preferred place is /usr/X11R6/lib/X11/XF86Config.The server looks for the configuration file in multiple places, so if you're upgrading from an earlier version, make sure you remove any old configuration files. We'll look at the contents of the file in detail in "XFree86 in depth" . In this section, we'll just look at how to generate a usable configuration.
From the configuration menu, select XFree86 and then xf86cfg. There is a brief delay while xf86cfg creates an initial configuration file, then you see the main menu of Figure 6-9. This application runs without knowing what the hardware is, so the rendering is pretty basic. The window on the left shows the layout of the hardware, and the window on the right is available in case your mouse isn't working. Select the individual components with the mouse or the numeric keypad. For example, to configure the mouse, select the image at top left:
In all likelihood that won't be necessary. The configuration file that xf86cfg has already created may be sufficient, so you could just exit and save the file. You'll probably want to change some things, though. In the following, we'll go through the more likely changes you may want to make.


