
| исключение в лабораторной работе № 3 |
Преподаватель
Вы можете этот курс.
Опубликован: 05.08.2010 | Уровень: специалист | Доступ: свободно
Самостоятельная работа 9:
Основы WPF
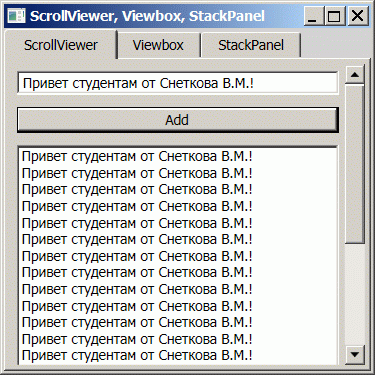
Упражнение 4. Элементы управления ScrollViewer, Viewbox и StackPanel
Элемент ScrollViewer прокручивает окно, если интерфейс с дочерними элементами в нем не помещается. Элемент Viewbox принимает одного потомка (можно контейнер) и масштабирует его пропорционально своим размерам.
-
 Добавьте к решению WpfApp новый проект с именем WpfApp4 и
назначьте его стартовым
Добавьте к решению WpfApp новый проект с именем WpfApp4 и
назначьте его стартовым
-
Заполните файл разметки
следующим кодом
<Window x:Class="WpfApp4.Window1"
    xmlns="http://schemas.microsoft.com/winfx/2006/xaml/presentation"
    xmlns:x="http://schemas.microsoft.com/winfx/2006/xaml"
    Title="ScrollViewer, Viewbox, StackPanel" Height="300" Width="300"
    Background="LightGray"
        >
    <TabControl>
        <TabItem Header="ScrollViewer">
            <ScrollViewer
                HorizontalScrollBarVisibility="Auto"
                VerticalScrollBarVisibility="Auto"
                >
                <Grid>
                    <Grid.RowDefinitions>
                        <RowDefinition Height="Auto" />
                        <RowDefinition Height="Auto" />
                        <RowDefinition />
                    </Grid.RowDefinitions>
                    <TextBox Name="textBox" Grid.Row="0" Margin="5" />
                    <Button Grid.Row="1" Margin="5" Click="Add_Click">Add</Button>
                    <ListBox Name="listBox" Grid.Row="2" Margin="5" />
                </Grid>
            </ScrollViewer>
        </TabItem>
        <TabItem Header="Viewbox">
            <Viewbox>
                <TextBlock>Текст</TextBlock>
            </Viewbox>
        </TabItem>
        <TabItem Header="StackPanel">
            <StackPanel Orientation="Vertical" Background="Aqua">
                <Button HorizontalAlignment="Center" Width="75" Margin="5">
                    Center
                </Button>
                <Button HorizontalAlignment="Left" Width="75">
                    <Button.LayoutTransform>
                        <RotateTransform Angle="-45" />
                    </Button.LayoutTransform>
                    Left (-45)
                </Button>
                <Button HorizontalAlignment="Right" Width="75">
                    <Button.LayoutTransform>
                        <RotateTransform Angle="45" />
                    </Button.LayoutTransform>
                    Right (45)
                </Button>
                <Button HorizontalAlignment="Stretch" Margin="5">Stretch</Button>
            </StackPanel>
        </TabItem>
    </TabControl>
</Window>-
Заполните кодовую часть
следующим кодом
using System;
using System.Collections.Generic;
using System.Text;
using System.Windows;
using System.Windows.Controls;
using System.Windows.Data;
using System.Windows.Documents;
using System.Windows.Input;
using System.Windows.Media;
using System.Windows.Media.Imaging;
using System.Windows.Navigation;
using System.Windows.Shapes;

namespace WpfApp4
{
    public partial class Window1 : Window
    {
        public Window1()
        {
            InitializeComponent();

            textBox.Text = "Привет студентам от Снеткова В.М.!";
        }

        private void Add_Click(object sender, RoutedEventArgs e)
        {
            listBox.Items.Add(textBox.Text);
        }
    }
}-
Запустите приложение
-
Попробуйте порастягивать
окно с дочерним элементом Viewbox - этот элемент масштабирует своего потомка